Prep: 30 Min. Cook: 30 Min. Serves: 6-8  Quick & Easy Dinner! This tasted amazing! Ingredients Used: - 2 cups uncooked egg noodles or spiral pasta
- 1/2 lb. lean ground beef
- 1/2 onion, chopped
- 2 cloves garlic, minced
- 1 green bell pepper, chopped
- 1 cup sliced pepperoni sausage
- 16 ounces pizza sauce
- 4 tablespoons milk
- 1 bag shredded mozzarella cheese
Directions: - Cook noodles according to package directions.
- Preheat oven to 350 degrees F (175 degrees C).
- In a medium skillet over medium-high heat, brown the ground beef with the onion, garlic and green bell pepper. Drain excess fat.
- Stir in the noodles, pepperoni, pizza sauce and milk, and mix well. Pour this mixture into a 2-quart casserole dish.
- Bake at 350 degrees F (175 degrees C) for 20 minutes, top with the cheese, then bake for 5 to 10 more minutes.
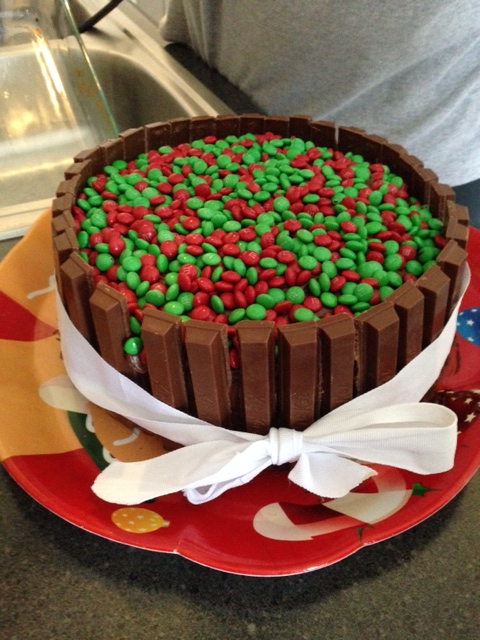
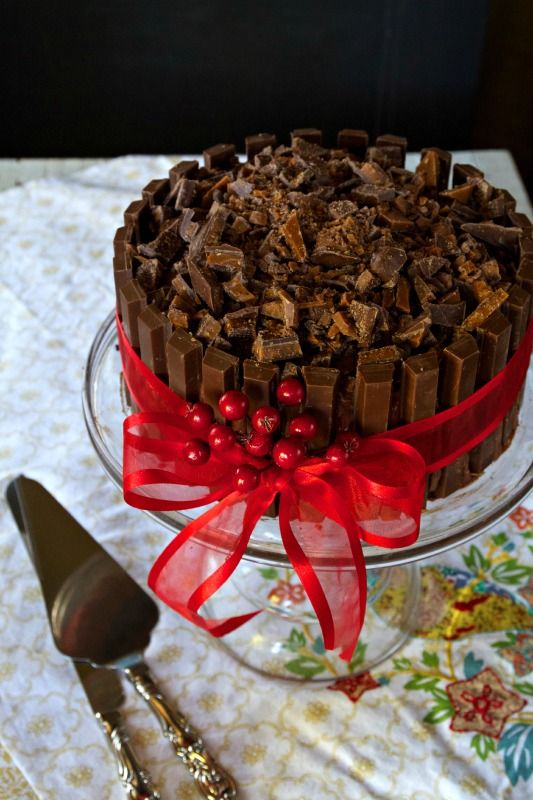
My niece is at it again! She made this tasty Kit-Kat Cake for Christmas, complete with red & green M&M's! However, you can switch up the toppings to go with any occasion! Ingredients & Materials Used: - Betty Crocker Cake Mix (your preference of flavor)
- 2 Containers Icing (your preference of flavor)
- 1 Bag M&M's (or your preference of topping)
- 4 King Size Kit Kat Bars
- 2 Round Cake Pans (disposable or reusable)
- 1 Serving Platter
- 1 Ribbon
Directions: - Prepare/bake cake mix according to instructions - splitting batter between 2 round cake pans
- Let cakes cool before icing!
- Place 1 cake on the platter and ice the top of it. Place the other cake on top of that and ice the top and sides.
- Break apart the Kit-Kat Bars, placing them snug against one another until the entire edge of the cakes are secured (like a fence).
- Place your ribbon around the cake, but not too tight! This is to hold to the pieces together, but you don't want the candy bars to break.
- Place your desired topping (M&M's, etc) on the top of the cake, covering the entire top!
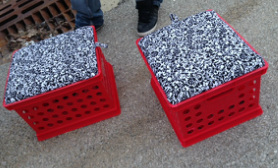 This great idea is brought to you by one of my talented and creative nieces, Morgan! She made this pair of nifty crate storage seats for me for Christmas! Store your animal toys, craft supplies, or games in these crates, and pull them out for additional seating for a game night with friends! Materials Used: - Plastic Crate (standard size)
- Sturdy/Thick Wood (cut to fit at your local Lowe's or Home Depot)
- Fabric of your choice
- Padding (thickness depends on your preference)
- Hot Glue
- Staples (staple gun)
Directions: - Start by picking out a sturdy piece of wood, preferably one that will hold a person if you plan to use this as seating.
- Cut the board to fit the inside of the plastic crate. There is a lip around the inside of the crate that the board will rest on once cut to fit.
- One yard of fabric covered both boards for both crates for this project, so depending on how many you are creating, take that into account.
- Cut your foam piece to fit the board, allowing it to cover the sides as well so they are soft on the edges.
- Wrap your fabric around the piece of board/foam tightly, stapling in place as you go until the entire piece is completely covered and in-tact.
- Morgan cut a small piece of fabric and looped it (adhered on the bottom of the board's edge with hot glue) to allow it to be pulled up to lift the board for storage.
- Voila! There you have it - 2 functions in one!
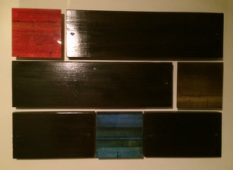 This was a fun project to make, which I have displayed in my loft for the last 2 years! It was very simple to construct and was made with very simple/inexpensive materials. If you can't find the glass pieces, incorporate other pieces of wood, cut into smaller blocks...stain them different shades...possibilities are endless! Materials Used: - Wooden Boards (cut to fit your desired dimensions)
- Dark Wood Stain
- Paint Brush
- Heavy-Duty Screws (for wall mounting)
- Glass Art Pieces (purchased on sale from Bed, Bath & beyond)
Directions: - Pick out your desired width of wood and have them cut at any lumber store
- Apply the wood stain to the pieces and let dry overnight
- Mount to the wall with the screws, while mounting the glass pieces/other wood fixtures
Pretty simple, but you can really make an impact with a piece like this in your home!
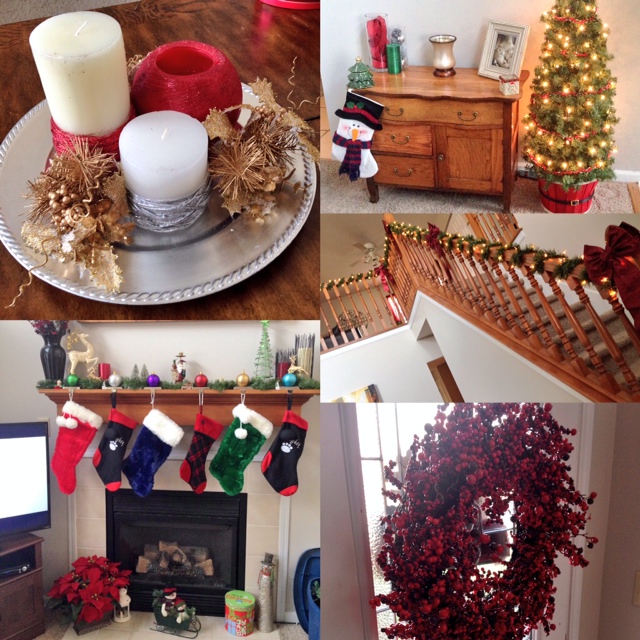
A few ideas on how to spruce up your home for the holidays!
All inexpensive pieces paired together to create a warm and seasonal vibe around the house!
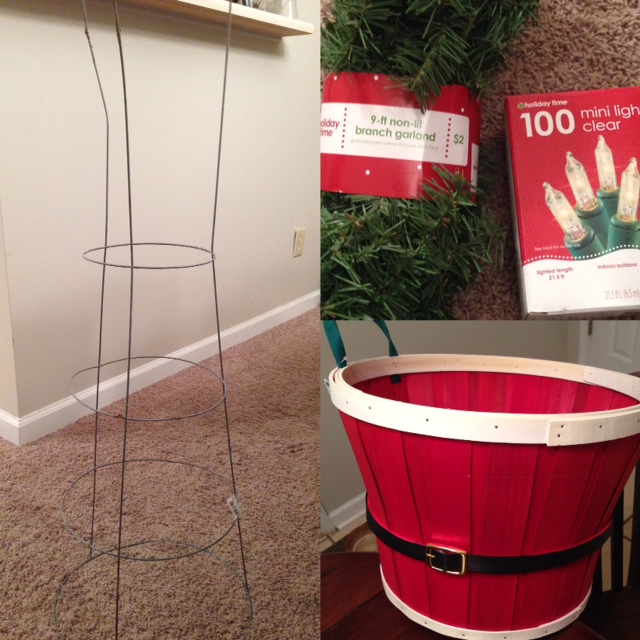
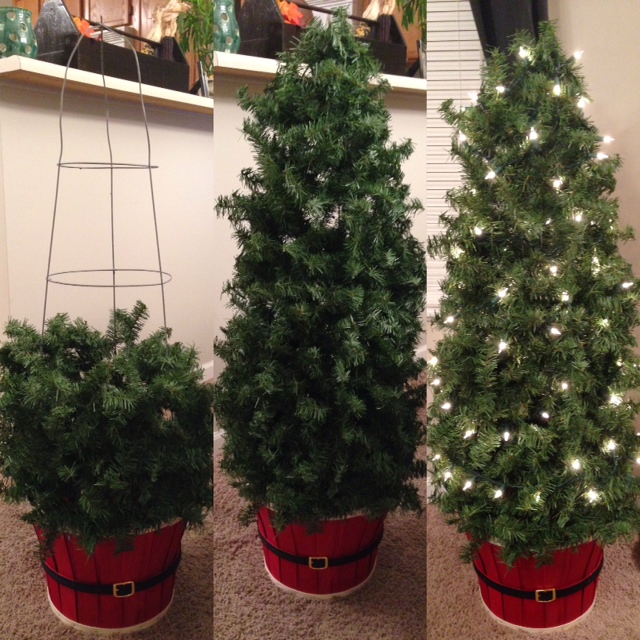
How to Make Inexpensive Indoor/Outdoor Topiary Trees (Tomato Cage & Garland)
Select images below for close-up details of each step
Materials Used: - 1 Tomato Cage (size of your choice)
- 5 Nine Foot Bundles of Garland (9' bundles at Walmart: $2 each!)
- 1 Box of 100 Lights
- 1 Planter Box or Bucket (that the large end of your cage will fit nicely on or in)
- Clear or Dark Color Zip Ties
- Wire Cutters
- Rocks/Bricks/Heavy Smaller Objects (to weight down if placing outdoors)
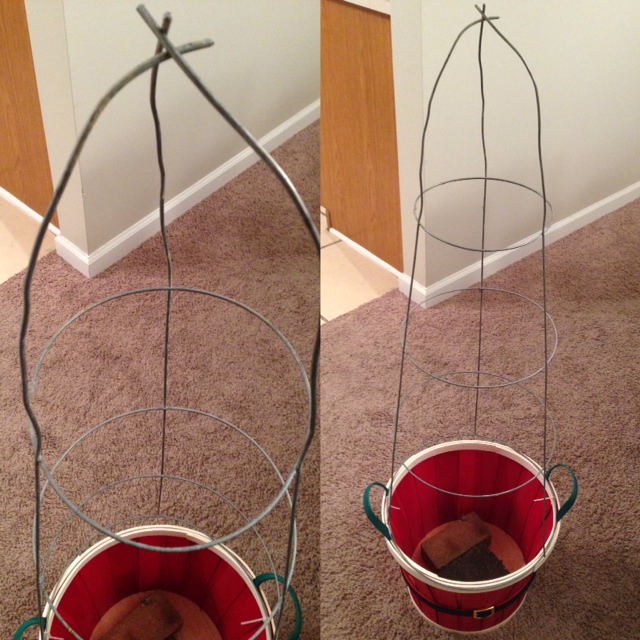
 Directions: - Begin by placing your tomato cage atop your planter; the largest opening in on the base
- I secured it to the bucket by zip-tying the wire down
- Next, place a couple objects in the bucket to weigh it down, if you will be placing this outdoors
- Carefully bend the top prongs of the wire cage into one another, forming your ideal tree shape
- Using wire-cutters, snip the excess metal from the top metal prongs to better form the top of the tree
- Begin stringing the garland at the base. I had to secure the garland to the base of the wire with a couple more zip-ties to ensure it stays in place.
- Continue covering until all garland bundles are used, securing each bundle to the wire with the hook end
- Cover the garland with your lights, and Voila!
Prep Time: 10 Min. Cook Time: 35 Min. Ready In: 1 Hr. Servings: 15
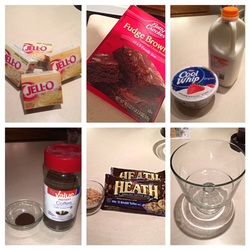 Ingredients: - 1 (19.8) Package Brownie Mix
- 1 3/4 Cup Milk For Each Pudding Mix Pair
- 2 (3.3 oz) Package White Chocolate Pudding Mix
- 2 (3.3 oz) Package French Vanilla Pudding Mix
- 4 Tsp. Instant Coffee Granules
- 2 Tbs. Warm Water
- 4 Cups Thawed Whipped Topping
- 1 Package Toffee Candy Pieces
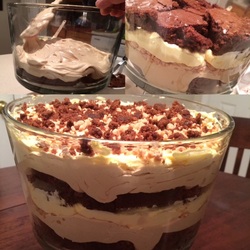 Directions: - Prepare brownies according to package directions
- Bake and cool completely - Cut into 1 inch cubes
- In medium bowl, whisk milk and White Chocolate Pudding mix until it begins to thicken (don't go by the amount of milk on the pudding mix box)
- Dissolve coffee granules in water - stir into pudding
- Fold in whipped topping
- Prepare French Vanilla Pudding the same way, folding in whipped topping (exclude the coffee granules)
- In a glass bowl or pan, layer one-third of brownie cubes, one-third of each pudding mixture and one third of candy - Repeat until all ingredients are used
- Top with candy and any extra brownie pieces
- Chill 30 minutes in refrigerator before serving
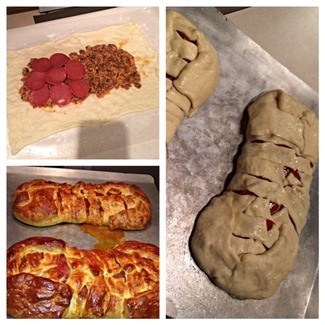 By far one of the easiest, and tastiest, recipes I've ever made! I'm addicted to these quick dinners, especially since you can basically mix together whatever ingredients you want ( as long as you have a binding agent to help mold the ingredients, i.e. marinara sauce). Incredible!
Ingredients:
- 2 Cans of Garlic Butter Crescent Rolls (substitute regular flavor if desired)
- 1 lb. Italian Sausage
- 1 Package of Turkey Pepperoni
- 3 Cups Mozzarella Cheese
- 1 Cup Marinara Sauce
- 1 Cup Optional Vegetables
- 1 Egg White
Directions:
Prep Time: 20 min. Cook Time: 30 min. Total Time: 50 min. Serves: 5 - Preheat oven to 375 degrees F
- On a parchment paper lined cookie sheet, spread both cans of crescents separately
- Press each of the seams to form a single layer of dough on each
- In a large bowl, combine cooked sausage, cheese, marinara and optional veggies
- Spread mixture over the centers of the croissant doughs evenly to create a log
- Using a sharp knife, cut horizontal strips 1 inch apart down each side of the crescent dough.
- Fold the dough strips over the top of the mixture, alternating left and right to create a braid
- Brush the top of the braid with a beaten egg yolk
- Bake for 20 – 25 minutes until golden brown
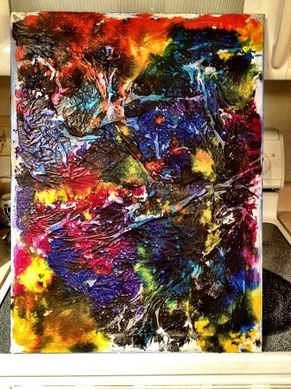 Whether you're looking for a fun activity for the kids, or looking to add some interesting artwork to your walls, you can't go wrong with project...made completely of melted crayons!
Materials Used:
- Canvas (size/amount of your choice)
- 1 Box of Crayons (brand doesn't matter)
- Wax Paper
- Potato Peeler or Knife (peeler works better)
- Iron
Directions:
- Begin by selecting your crayon color choices
(use multiple colors for the effect shown here)
- Using the potato peeler/knife, you will need to shave the crayons until small slivers are produced. (either separate the colors into a bowl to distribute onto the canvas later, or begin spreading out on the blank canvas)
- Once you have shaved down the crayons, begin spreading the shavings over the canvas
- When you've reach the desired amount, place a sheet of wax paper over the top of the shavings (I doubled it and put 2 pieces over the top to ensure my iron didn't melt through to the crayon)
- Turn your iron on medium, or cotton, and begin pressing down lightly atop the crayon shavings (the paper may wrinkle a bit, and that's okay, it will give a neat effect once complete)
- You'll notice the colors begin to melt - you can shape and blend the colors using the iron as well
- Once the desired effect is reached, remove the wax paper and let dry for a few minutes
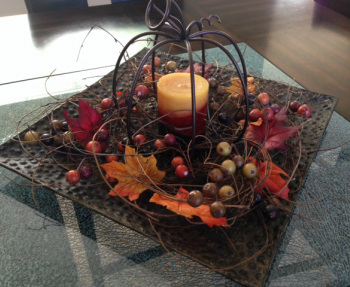 Every dining room table, or coffee table, needs a splash of color and excitement for the holiday seasons. This Autumn color inspired centerpiece is the perfect addition to your home for the Fall season!
Materials Used:- Bundle of Vine or Miniature Vine Wreath (broken up into various sized pieces)
- Autumn Colored Candle
- Berry Twig Stems
- Faux Leaves
- Metal Pumpkin Shaped Candle Holder Centerpiece
- Centerpiece Tray of Your Choice
Directions:- Start by placing the metal pumpkin in the center of your tray
- Arrange the broken up vine pieces around the pumpkin, and throughout the tray
- Add the leaves and berries, as you see fit, ensuring to spread them out over the tray
- Place the candle inside the pumpkin, and set atop your table!
|


 RSS Feed